SolarBright Awarded Powerwall Premium Certified Installer

SolarBright has been recognised with Tesla Powerwall Premium Certified Installer status, reflecting our installation quality, technical capability, and ongoing experience delivering Tesla battery systems across Sydney and NSW.

This recognition aligns with how we already operate day to day: design the system properly, install it cleanly, commission it correctly, and support customers long after the install is complete.

What the Tesla Premium Installer recognition means

Premium-level recognition is a practical signal that the installer has proven capability with Tesla battery systems and consistent standards across installs.

For homeowners, that typically translates to confidence in the things that matter most:

  • Correct system design and sizing for your usage and goals
  • Clean, compliant installation practices
  • Proper commissioning and monitoring setup
  • A team that installs Tesla batteries regularly, not occasionally

Why this matters for customers

A Tesla Powerwall system is not just “fit the battery and walk away”. Performance, reliability, and long-term outcomes depend heavily on design choices, installation workmanship, and commissioning.

SolarBright provides a stress-free process from first enquiry through to installation and ongoing support – so you get reliable storage without the headaches.

Current Offers on Tesla Powerwall 3 and Expansion Packs

Right now, SolarBright is running strong value offers on Tesla Powerwall 3, with $6,600+ in rebates available for eligible households.

If you are looking to scale storage, Powerwall 3 Expansion Packs also have $5,200+ in federal battery rebate savings available.

And for customers who want a complete bundle, SolarBright has Tesla solar and battery package deals live now, including offers showing $11,000+ to $12,000+ in rebates and incentives (package dependent).

SolarBright’s Commitment to Ongoing Post-Installation Support

Installing a Tesla Powerwall 3 (and adding Expansion Packs) is just the beginning. SolarBright provides reliable after-sales support to help your system keep performing the way it should.

We assist with monitoring and performance checks, help you make sense of the Tesla app, and troubleshoot any issues that come up as your usage changes across seasons. If something needs manufacturer input, we can also coordinate directly with Tesla so you get clear answers and a faster path to resolution.

Looking for a Tesla battery installer in Sydney or NSW?

SolarBright installs Tesla batteries across Sydney and NSW, including Tesla Powerwall 3 and Powerwall 3 Expansion Packs.

Contact SolarBright or book a free consultation to choose the best package for you.


MaxLED Solar Skylight vs Traditional Skylights

Traditional skylights can be a great way to bring natural daylight into your home. But they’re not always the most practical option – especially if you just want to brighten a darker space without a bigger roof and ceiling project.

In many homes, a conventional skylight can involve extra roof work, more waterproofing considerations, and a larger installation footprint than you need. If the goal is to light up a hallway, pantry, laundry, stairwell, or internal room, a full skylight solution can feel like overkill.

That’s where SolarBright’s MaxLED Solar Skylights shine. Instead of relying on a roof window or reflective tube, MaxLED uses a roof-mounted solar panel to power a bright ceiling LED diffuser – giving you clean, practical light with no mains power connection and no running costs.

What Is a Solar Skylight?

A solar skylight is a lighting system powered by the sun. A compact solar panel is installed on the roof, then connected to a ceiling-mounted LED diffuser inside your room. The panel captures sunlight, converts it into electricity, and powers the LED light – so you get bright illumination where you need it, without using grid power.

Why MaxLED Solar Skylight Is a Great Alternative to Traditional Skylights

Bright light without electrical wiring

MaxLED Solar Skylight is powered by solar energy, so you can brighten dark areas without running new mains wiring through your ceiling cavities.

Ideal for hard-to-light spaces

Solar skylights are perfect for areas like:

  • hallways and corridors
  • walk-in robes and wardrobes
  • pantries and laundries
  • stairwells and entry zones
  • garages, sheds, and utility rooms
  • commercial corridors, storerooms, and back-of-house areas

Two sizes to suit different rooms

MaxLED comes in two practical sizes – 250mm and 400mm – so you can match the light output to the space.

Modern, clean light colour

MaxLED produces a crisp “pure white” style light that suits everyday use and helps spaces feel brighter and cleaner.

Low running costs

Because the system is solar powered, the light runs on free energy from the sun – helping reduce daytime lighting use from the grid.

MaxLED Solar Skylight Models: Choose the Right Option for Your Home

SolarBright offers two MaxLED Solar Skylight options depending on how you use the space.

MaxLED Standard (Best for daytime lighting)

The Standard MaxLED Solar Skylight is designed to deliver bright, reliable light when the sun is shining. It’s ideal for areas used mainly during the day – like hallways, pantries, laundries, and internal rooms.

What you get:

  • roof-mounted solar panel
  • ceiling LED diffuser (round or square finish options)
  • connecting cable for a neat installation

Best for: daytime lighting in frequently used walkthrough areas and utility spaces.

MaxLED24 Day & Night (Best for after-dark lighting + convenience)

If you want light at night or in low-sun periods, the MaxLED24 Day & Night model is the premium choice. It includes a rechargeable battery that stores energy so the LED light can run when the panel isn’t producing.

Key features:

  • higher output solar panel
  • integrated rechargeable lithium battery
  • motion sensor to help preserve battery energy
  • remote control for on/off and dimming
  • ceiling LED diffuser with round or square finish options

Best for: stairwells, entry zones, hallways at night, and anywhere you want “set and forget” lighting with extra convenience.

Need help choosing the right MaxLED?

Book a free consultation with our skylight expert and we’ll recommend the best option for your home and budget.

Talk to a Skylight Expert

How MaxLED Works (Simple Breakdown)

MaxLED Solar Skylights (Standard)

  1. The roof panel captures sunlight.
  2. Sunlight is converted into electricity.
  3. Electricity powers the ceiling LED diffuser inside the room.

MaxLED24 Solar Skylight Day & Night

  1. The roof panel powers the LED during daylight.
  2. Extra energy charges the integrated battery.
  3. At night or during low-sun periods, the battery powers the LED.
  4. Motion sensing and dimming controls help you manage brightness and battery usage.

Quick Specs That Matter

Here are the practical specs most homeowners care about when comparing options:

  • Sizes: 250mm and 400mm
  • Bright output: designed to deliver strong, useful lighting for common household spaces
  • Light colour: pure white-style light suited to everyday use
  • Day & Night option: battery-backed lighting for after-dark use
  • Controls (Day & Night model): motion sensor + remote dimming

If you’re unsure which size is best, a quick check of the room size and how you use the space usually makes the decision easy.

Warranty and Peace of Mind

MaxLED Solar Skylights are built for long-term use, with warranty coverage that supports confidence in the product – especially important when choosing a roof-installed solution. (Exact warranty terms vary by model and components.)

Traditional Skylights vs SolarBright MaxLED Solar Skylights: Which One Suits Your Space?

Feature Traditional Skylights SolarBright MaxLED Solar Skylights
What it is A roof opening that brings natural daylight into the room. A roof solar panel powers a ceiling LED diffuser to deliver skylight style lighting.
Type of light Real sunlight. Brightness changes with weather, time of day, and roof position. Consistent LED light powered by the sun. Designed for practical everyday brightness.
Night time lighting No. You still rely on normal lights after dark. Yes with the Day and Night model that includes a battery.
Installation scope Often more involved. Roof cut, flashing, waterproofing, and internal finishing. Often simpler. Mount the panel, run the cable, fit the diffuser. No mains power connection needed.
Waterproofing complexity Higher. Correct flashing and sealing are critical. Lower. No large skylight unit or window style opening is required.
Heat transfer Can increase heat gain or heat loss depending on the glazing and placement. No direct sun opening into the room. Light is delivered via LED rather than glazing.
Best for Living spaces where you want true daylight and the feel of natural sun. Dark areas where you want reliable light, such as hallways, pantries, laundries, stairs, and wardrobes.
Performance on cloudy days Still works, but brightness can drop. Works during daylight. Day and Night can use stored battery energy when sunlight is low.
Running cost Daylight is free, but room temperature changes can affect heating or cooling use. The light itself runs on solar energy, so there is no ongoing electricity cost for lighting.
Control Limited. Some systems add blinds as an extra. Day and Night includes motion sensing, plus remote on off and dimming.
Ideal when You want natural daylight and are comfortable with a larger installation scope. You want a simpler way to brighten a room, especially where a traditional skylight is not ideal.


Where MaxLED Solar Skylights Make the Most Sense

MaxLED Solar Skylight is ideal when you want a practical lighting upgrade without a major installation footprint. It’s especially popular for:

  • homes with dark internal zones
  • rooms that need light but don’t justify a traditional skylight build
  • spaces where running new electrical wiring is difficult or costly
  • people who want a low-running-cost lighting option powered by the sun

If you want lighting that continues after dark, the MaxLED24 Day & Night model is the easy pick.

Ready to Brighten a Dark Room?

If you’re considering a SolarBright Solar Skylight (MaxLED) and want help choosing the best model and size, Contact SolarBright or book a free consultation with a Solar Skylight specialist.

We’ll recommend the right option based on your room, roof, and how you want to use the light – so you get a clean result that feels right from day one.


DIY Tubular Skylights

“DIY skylights” typically refers to skylight systems that can be installed without major building work, assuming you have straightforward roof access and are confident using basic tools. In most cases, DIY skylights fall into three categories:

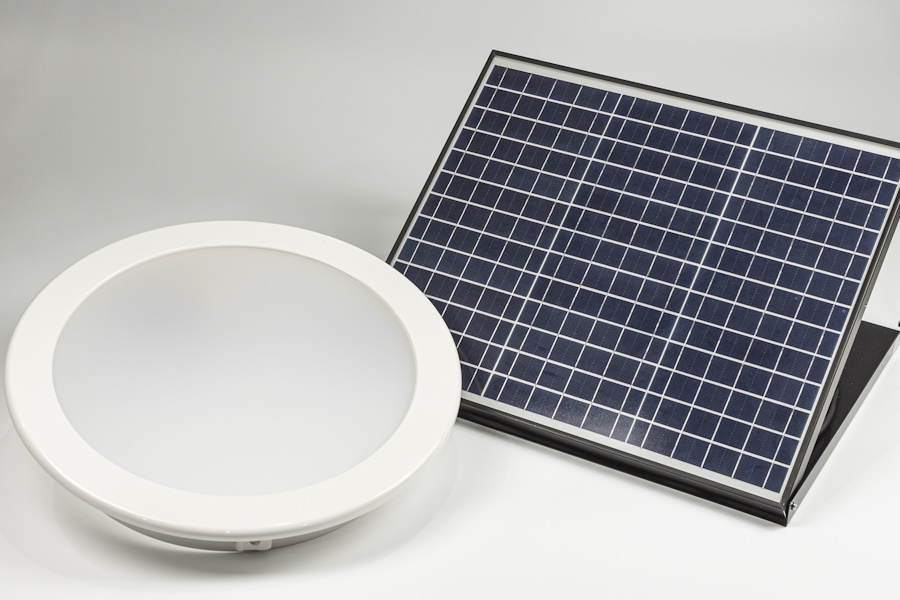
  • Tubular skylights: A compact roof opening captures daylight and channels it through a reflective tube to a ceiling diffuser. This is typically the most DIY friendly option.
  • Fixed skylights: Larger units that can deliver strong light but often require more complex flashing, waterproofing, and internal finishing.
  • Operable skylights: Openable skylights that allow airflow. These add complexity due to moving parts, sealing requirements, and sometimes electrical components.

If your goal is a skylight that is simple to install, easier to get right, and still delivers excellent natural light, tubular skylights are usually the best place to start, especially when the kit is properly modular and designed for installer friendly assembly.

Why DIY Skylights are so popular

DIY skylights are one of the fastest ways to brighten a dark home and make spaces feel larger, cleaner, and more comfortable. The difference between a smooth installation and a frustrating experience often comes down to the skylight system you choose.

Some skylight kits feel like a loose collection of parts with unclear instructions. This can lead to issues such as messy ceiling cut outs, poor alignment, and the most serious risk of all, water leaks after heavy rain.

MaxLight Tubular Skylights are designed to avoid these problems. MaxLight is a modular roof to ceiling system with a clear installation sequence, making it one of the easiest skylight solutions for confident DIYers. It is also a fast, low disruption option if you prefer professional installation.

Is it easy to install skylights?

It can be, if you choose the right type of skylight and your roof conditions are suitable.

Traditional fixed skylights often involve:

  • A larger roof cut out
  • More detailed flashing and waterproofing
  • Additional internal framing and finishing work
  • A higher risk of issues if installation is not precise

Tubular skylights are typically easier because:

  • The roof opening is smaller
  • The system installs in clear, defined stages
  • Less invasive structural work is required
  • The light path is controlled through the reflective tube and diffuser

If your goal is simple installation with strong daylight impact, tubular skylights are usually the most forgiving DIY option, especially when the product is designed around installation simplicity.

Tools, experience, and handling

You do not need to be a builder, but DIY skylights are not a no tools project. You should be comfortable measuring accurately, making clean cut outs, and finishing neatly.

Helpful experience includes:

  • Cutting plasterboard cleanly
  • Using a drill or driver confidently
  • Aligning components accurately
  • Applying sealants correctly
  • Working safely at height

Typical tools required, depending on roof type and model:

  • Tape measure, marker, straight edge
  • Drill or driver
  • Jigsaw or plasterboard saw
  • Ladder and appropriate roof access equipment
  • PPE such as gloves, eye protection, and dust mask

One important reality check. The biggest DIY risk is not cutting the ceiling. It is ensuring proper roof sealing and waterproofing. If you are not confident working on the roof, or if access is steep or difficult, it is often smarter to choose MaxLight and have the roof installation completed professionally.

What to look for in DIY skylights

If you want your DIY skylight project to go smoothly and achieve a professional result, prioritise the following:

A complete, purpose built skylight system
Choose a skylight that is designed as a complete roof to ceiling solution, not a collection of separate parts. A fully integrated kit ensures compatibility between components and removes uncertainty during installation.

Clear installation instructions and logical assembly
The system should include clear, step by step instructions and components that fit together in an obvious sequence. This reduces guesswork and helps prevent installation mistakes that could affect performance or sealing.

Roof sealing designed for reliability
The roof section should be engineered to integrate properly with your roofing material and manage water effectively. Proper sealing design is critical to prevent leaks and ensure long term durability.

Installation that works within standard roof structures
The best DIY skylights are designed to fit within standard roof framing without requiring structural modification. This makes installation safer, faster, and more achievable for confident homeowners.

Strong light performance with a clean ceiling finish
A well designed skylight should deliver consistent, natural light and finish neatly at ceiling level. The diffuser and reflective tube should work together to provide excellent light output while maintaining a clean, professional appearance.

Why MaxLight Skylights are DIY-friendly

MaxLight is engineered specifically for installation simplicity. Every component is purpose built to integrate in a clear, logical sequence. This helps eliminate guesswork and reduce installation difficulty.

Components designed for fast, reliable installation
MaxLight is built as a complete roof to ceiling system. This includes the roof section, reflective tube, and ceiling diffuser. This modular design provides:

  • Clearly identifiable components
  • Accurate alignment from roof to ceiling
  • A predictable, structured installation process
  • A clean, professional end result

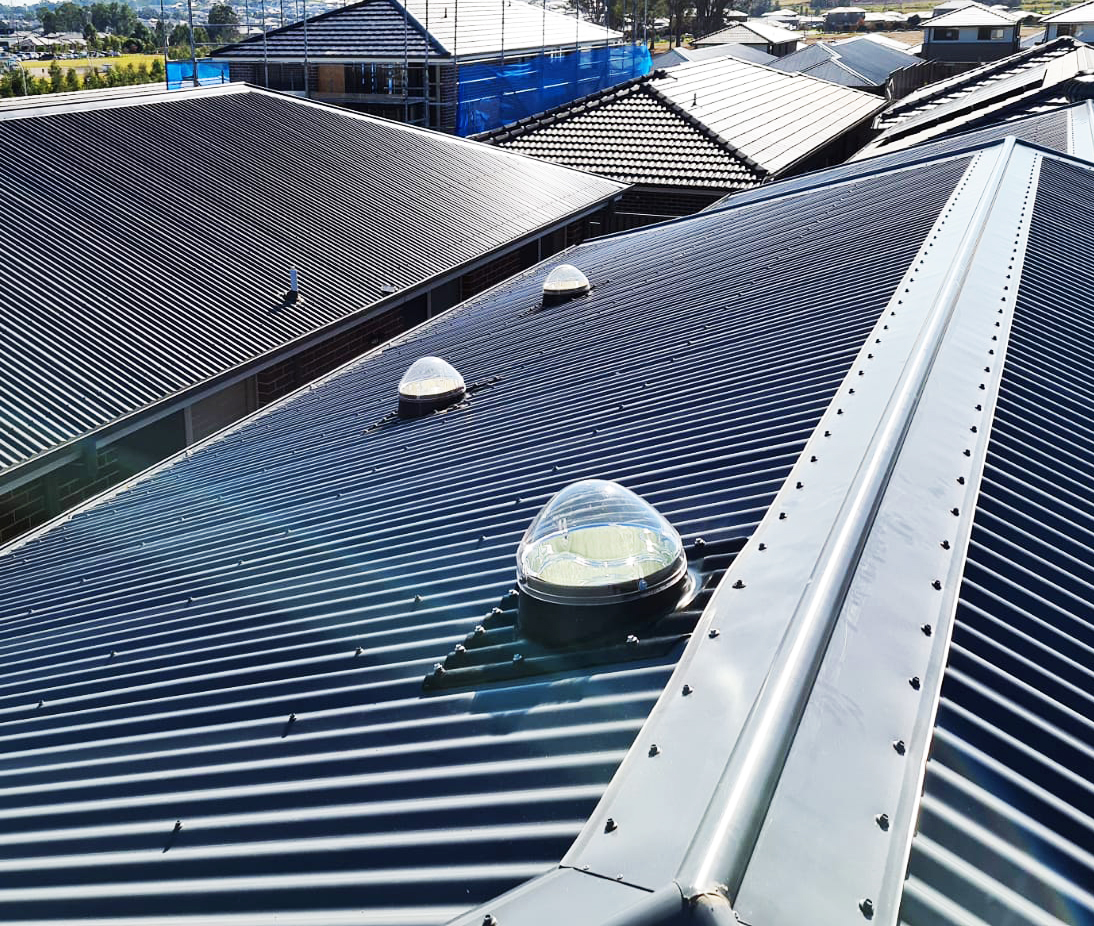
Smaller opening, less disruption
Compared with many traditional skylights, MaxLight typically requires a smaller roof penetration. This reduces invasive work and makes installation easier to manage, particularly in standard residential roofs.

Clean ceiling finish with excellent light distribution
MaxLight reflective tube efficiently channels daylight to the diffuser. This delivers even light distribution and a clean, modern ceiling appearance.

Built for Australian conditions
MaxLight skylights are designed and manufactured in Australia by SolarBright. They are engineered to handle local conditions including strong sun, heat, storms, and typical Australian roofing environments.

MaxLight Skylight DIY Installation Guide

Before installation, always review the official instructions so you understand the full process.

Here is a link to MaxLight Skylights Installation Instructions.

MaxLight packaging is organised so components are easy to identify. Key parts are clearly marked, helping reduce confusion during installation and ensuring a smoother process, especially when working in the roof cavity or on the roof.

Looking for DIY Skylights Expertise?

Not sure which MaxLight size suits your room, or whether your roof layout is suitable for DIY installation?

Contact SolarBright or book a free consultation. Our team can help you select the right skylight, confirm optimal placement, and recommend the cleanest installation approach for your home.

SolaX Power Premium Installer Australia 2025

SolarBright has been recognised as a SolaX Power Premium Installer (Australia, 2025). This milestone reflects proven product knowledge, quality workmanship, and consistently compliant installations.

2025 has been a standout year for SolarBright. We have received multiple recognitions, including:

  • Sungrow Top Installer Award (2025)
  • Tesla Powerwall Premium Certified Installer status
  • EUPD Research Installer Award (2025)

These recognitions reflect our consistent quality and trusted expertise in solar system and solar battery installation.

Selection criteria for the recognition

The SolaX Power Premium Installer recognition reflects installation performance, technical capability, and partnership quality. It is not a public voting award. It is reserved for a select group of trusted installers.

This recognition reflects consistency across:

  • Real-world installation performance and proven track record
  • Quality and compliance standards across every install
  • Technical capability with battery and hybrid systems
  • Strong manufacturer partnership and ongoing engagement

What this means to SolarBright

This recognition reinforces our focus on installing SolaX systems the right way.

It reflects:

  • Proven experience installing SolaX battery systems
  • Strong technical capability across system design and commissioning
  • Continued commitment to quality and customer experience

If you are considering a SolaX battery system, SolarBright is equipped to deliver a professional installation you can rely on.

What this means to you

Choosing SolarBright provides real benefits beyond recognition.

More experience. Less guesswork.

Our team installs solar and battery systems every day. This ensures correct battery sizing, inverter compatibility, and clear performance expectations from the start.

Better value and stronger offers

Our direct partnership with SolaX allows us to offer competitive pricing and access to eligible rebates and incentives.

Hassle-free installation

You receive clear advice and straightforward recommendations. The installation process is smooth from start to finish.

Greater peace of mind

Manufacturer recognition provides confidence that your system will be installed correctly and supported properly over its lifetime.

Current SolaX solar and battery offers

Below are three popular system options. These include battery-only and solar plus battery packages. All are designed to maximise value and rebate eligibility where applicable.

Battery only: SolaX Triple Power (15.3kWh)

A great option if you already have solar and want to store excess energy for night-time use.

  • Up to $5,500 in rebates and incentives

View the battery-only offer.

Solar and Battery Package: 10.2kWh Battery + 6.6kW Solar

A balanced system designed to reduce electricity bills and provide reliable energy storage.

  • $7,400+ in rebates and incentives

View the 10.2kWh + 6.6kW offer.

Solar and Battery Package: 15.3kWh Battery + 13.2kW Solar

A higher-capacity system suited for larger homes or higher energy usage.

  • $11,000+ in rebates and incentives

View the 15.3kWh + 13.2kW offer.

Need help choosing the right SolaX battery?

Book a free consultation with SolarBright. We will recommend the best system based on your energy usage, roof space, and goals.

Solar Battery Sizing Guide

Getting your battery size right makes a bigger difference than most people expect. The right capacity helps you store more daytime solar and use it at night, reduce grid use during peak times, and add real backup coverage during outages.

Most home batteries fall into two categories:

  • Fixed-size batteries like Tesla Powerwall 3, which start as one set capacity and can be expanded later using Expansion Packs.
  • Modular batteries, which grow by adding modules.

In this blog, we’ll explain how battery sizing works and walk through the battery systems we offer, including fixed and modular options. You’ll learn how each model scales, what the maximum capacities look like, and how to choose the right size for your home and energy goals.

Fixed sized Solar battery

A fixed-size battery is a single unit with a set storage capacity. It’s usually the simplest option because the footprint is clean and the sizing decision is straightforward.

A strong example is Tesla Powerwall 3. It starts as a fixed-size battery, but it can scale up later using Expansion Packs. That gives you the simplicity of fixed sizing with a clear upgrade path if your usage grows.

Fixed sizing is often ideal when you want:

  • a simple “choose once” battery decision
  • reliable night-time coverage for bill savings
  • a neat install with strong performance

Modular Solar Battery

A modular battery system builds capacity in blocks. You start with a base number of modules and expand later by adding more.

Modular batteries suit homeowners who want:

  • more control over sizing and budget
  • the ability to grow storage as the household grows
  • flexibility for future loads like EV charging or bigger air-conditioning use

The key advantage is simple. You can start at a practical size now, then expand later instead of replacing the system.

SolarBright’s battery range

Our current solar batteries range covers both fixed and modular sizing styles:

Tesla Powerwall 3 and Expansion Pack

Powerwall 3 is a fixed-size battery designed for strong household coverage and a clean installation. The key sizing advantage is that you can start with one battery, then increase storage later using the Powerwall 3 Expansion Pack.

Base size, expansion steps, and maximum capacity:

  • Powerwall 3 usable capacity: 13.5 kWh
  • Each Expansion Pack adds: 13.5 kWh
  • Maximum Expansion Packs supported: up to 3
  • Maximum total storage: up to 54 kWh

That creates clear “steps” you can size to:

  • 13.5 kWh (Powerwall 3 only)
  • 27 kWh (Powerwall 3 + 1 Expansion Pack)
  • 40.5 kWh (Powerwall 3 + 2 Expansion Packs)
  • 54 kWh (Powerwall 3 + 3 Expansion Packs)

Current Powerwall 3 Deals

These packages are built for households that want noticeable night-time coverage, stronger self-consumption, and a cleaner pathway to expand later.

Sungrow SBR

Sungrow SBR is a modular battery designed to scale by adding modules. It’s ideal if you want to start with a sensible size, then expand later as your needs increase.

Module size and maximum configuration

SBR uses modular blocks that scale storage up in steps.

  • Module size: 3.2 kWh
  • Minimum configuration: 2 modules (6.4 kWh)
  • Maximum per stack: 8 modules (25.6 kWh)
  • Maximum total storage (with supported expansion): 32 modules is 102.4kWh

This makes SBR a strong option for households that want to start mid-size and still have a high ceiling if they later want a bigger build.

Current Sungrow SBR Deals

Sungrow SBH

Sungrow SBH is another modular platform, often chosen when you want a higher-capacity build from day one.

Module size and maximum configuration

SBH is designed for larger storage sizing in modular steps.

  • Module size: 5 kWh
  • Minimum configuration: 4 modules (20 kWh)
  • Maximum per stack: 8 modules (40 kWh)
  • Maximum total storage (with supported expansion): 32 modules is 160kWh
  • Best for: SBH suits larger homes aiming for stronger overnight coverage, heavier night loads, and higher energy independence goals.

Current Sungrow SBH Deals

SolaX Triple Power Battery

SolaX Triple Power uses 5.1kWh modules, making it a practical modular option when you want storage to scale in clean steps.

Module size and maximum configuration

  • Module size: 5.1 kWh
  • Common starting points: 10.2 kWh (2 modules) and 15.3 kWh (3 modules)
  • Maximum supported storage: can scale substantially depending on model and tower configuration

This is why SolaX is popular for homeowners who want to start at a sensible capacity, then expand later rather than oversizing upfront.

Current SolaX Deals

Are these batteries qualified for rebates?

Eligibility depends on current rebate rules, your install timing, and your site details. In many cases, these battery systems can be eligible when installed and commissioned to program requirements.

The safest approach is to confirm:

  • your address and state program settings
  • whether rebates have been claimed at the premises before
  • which battery and system configuration you’re installing

If you need help confirming rebate eligibility for your home, get in touch with SolarBright and book a free consultation.

Do you do custom solar battery installation?

Yes. Custom installs are available for both:

  • battery-only upgrades (if you already have solar)
  • solar and battery packages (for maximum charging performance and long-term value)

Sizing is based on your usage, tariff, goals, and future plans so you get a system that actually delivers results.

Get in touch

Get in touch to choose the right battery size.

Book a free consultation for tailored sizing advice, or call us to speak with a battery specialist today.

Solar Roof Ventilation vs Whirlybirds

If your home feels hotter than it should in summer, the roof cavity is often a big part of the problem. Heat builds up above the ceiling and can push indoor temperatures higher. A roof ventilation system helps by moving that trapped hot air out, which can improve comfort and reduce the load on cooling.

Two options are common in Australia. Whirlybirds are the classic low-cost choice. Solar roof ventilation is the modern upgrade, running on sunlight and offering more control. This guide compares both so you can choose the right fit for your roof, your climate, and your budget.

Quick decision guide

Choose whirlybirds if you want a simple, low-cost solution and your area gets regular breezes.

Choose solar roof ventilation if you want more consistent performance on hot, sunny days especially when the air is still and you want better control.

Comparison table: Whirlybirds vs MaxBreeze Solar Roof Ventilation

Feature Whirlybirds Solar roof ventilation (MaxBreeze style)
How it works Passive. Uses wind + natural convection Active fan powered by solar energy
Performance on extremely hot ways with little wind Can be limited Stronger performance on sunny days, even with little wind
Control No thermostat. Spins whenever wind hits Thermostat-based operation (runs when roof space is hot)
Moisture / condensation support Can help, but varies by conditions More consistent extraction, better suited to heat + moisture goals
Noise Usually low, may rattle over time Generally quiet, steady operation (model dependent)
Upfront cost Lower Higher
Best fit Budget-friendly ventilation where wind is common Homes wanting consistent results and better control


What roof ventilation actually does (and what it doesn’t)

Roof ventilation’s job is to:

  • Remove hot air trapped in the roof cavity
  • Help move out stale air and moisture in some conditions

It is not a replacement for:

  • Ceiling insulation
  • Sealing major air leaks into the roof space
  • Properly sized air conditioning in extreme heat

The best results usually come from a combination of good insulation, smart ventilation, and sensible shading.

Price comparison – including installation

Pricing varies based on roof type, pitch, height, access, and how many vents are needed. As a general guide:

  • Whirlybirds: often around $450–$750 installed per unit, sometimes less for straightforward roofs or multiple units
  • Solar roof ventilation: often around $550–$1,000+ installed per unit, depending on the model and installation complexity

What changes the price most

  • Single-storey vs Double-storey
  • Steep roof pitch
  • How many vents are required for your roof size

Tip: When comparing quotes, make sure you’re comparing the same scope. Some prices include flashing upgrades and call-outs while others don’t.

The real difference is performance on the days that hurt most.

The hottest roof spaces usually occur on bright, still summer afternoons. That’s also when passive ventilation can be least effective.

Whirlybirds: best when it’s windy

Whirlybirds can be a good option if your home is in a breezy area. They spin using wind and help create airflow through the roof cavity.

Pros

  • Low upfront cost
  • Simple design, no electronics
  • Can work well in consistently windy locations

Cons

  • Performance varies day to day
  • Can be underwhelming on still, hot days
  • No “on/off when needed” control

Solar roof ventilation: built for sunny conditions

Solar roof ventilation uses sunlight to power a fan that actively pulls hot air out of the roof cavity. It is designed to run during the periods when roof heat is often at its peak.

Pros

  • More consistent extraction on sunny days
  • Better performance during hot, still weather
  • Thermostat control helps it run when roof temperatures rise

Cons

  • Higher upfront cost
  • Model choice and installer quality matter more

Control matters more than most people think

Control is one of the biggest “feel it in real life” differences.

  • A whirlybird spins whenever wind hits it, including cooler days when you don’t necessarily want extra airflow.
  • A solar fan system typically runs based on roof temperature, meaning it can stay off when it’s not needed.

If you want ventilation that behaves more like an appliance you can rely on, solar fan ventilation is usually the better match.

MaxBreeze model cheat sheet

MaxBreeze 40W Zephyr Day & Night Solar Roof Ventilator

If you’re considering MaxBreeze (or similar solar fan systems), choose based on the job.

1) Standard residential heat reduction

Best if:

  • Your main goal is reducing roof cavity heat during sunny hours
  • You want a “set and forget” solution with thermostat control

Usually suits:

  • Most homes
  • Typical roof cavity volumes
  • Standard summer heat issues

2) Larger roofs and tougher heat problems

Best if:

  • Your roof cavity is large
  • Internal areas heat up significantly
  • You want stronger airflow extraction

Usually suits:

  • Larger homes
  • Homes with complex roof lines
  • Dmall commercial-style spaces (workshops, studios)

3) Heat plus moisture management

Best if:

  • You notice condensation issues
  • You want consistent extraction, not wind-dependent ventilation
  • You’re pairing ventilation with good insulation and sensible roof sealing

Tip: Sizing matters more than brand. One underpowered vent often disappoints. A properly sized setup is where people notice the real change.

Which option should you choose?

Choose whirlybirds if:

  • You want the lowest upfront cost
  • Your area gets regular breezes
  • You want basic roof space ventilation
  • You’re comfortable with variable performance

Choose solar roof ventilation if:

  • Your roof space runs very hot in summer
  • You want reliable performance on still days
  • You want thermostat-based operation
  • You want better control of heat and moisture

Before choosing, ask:

  • Are we ventilating for heat only, or heat plus moisture?
  • What controls are included (thermostat, settings, optional upgrades)?
  • What warranty covers both the product and the installation?

Solar Roof Ventilation vs Whirlybirds FAQs

Do whirlybirds actually make a home cooler?
They can reduce roof cavity heat, which may improve comfort. Results depend on wind, placement, roof design, and insulation.

Will solar roof ventilation reduce air-con use?
It can help reduce roof cavity heat during sunny hours, lowering the cooling load on hot days. The biggest difference is often improved comfort, especially in upstairs rooms or rooms with large ceiling exposure.

Is solar roof ventilation worth the extra cost?
It often is if you experience hot, still days or want more consistent results and better control than a passive vent can provide.

Final verdict

Whirlybirds are a solid budget option when conditions suit. Solar roof ventilation is the better pick when you want consistent performance and control especially during summer heat.

Call SolarBright to discuss the best roof ventilation option for your home, or request a callback and we’ll contact you at a time that suits.